Climbing Anchor Systems - The Fundamentals
By Gregg Beisly
Whether at the local crag, on a multi-pitch rock mission, or in the alpine on rock or ice, creating good anchor systems is a core climbing skill that needs to be learned and practiced. Taking a course or learning from experienced climbers is best for mastering the art of climbing anchors. The following is hopefully a good reminder or discussion starter.

Fundamental to a good anchor system is that it is Strong, Redundant, Load Sharing and Checked before use. There are other factors that may also be important on some climbs, such as efficiency of time and gear on long multi-pitch or alpine routes, but these are ones to always aim for.
In a later article we’ll have a look at the pros and cons of different anchor set ups and more in depth at forces among other things, but here we will focus on the basic systems.
Strong
Your anchor needs to be unquestionably strong enough for the forces that it may be subject to. If there is any doubt, don’t commit to using it. There are almost always other options.
In a multi-pitch setting, a strong anchor may need to be multi-directional (able to take an upwards pull) if a leader falling will haul the belayer up high enough to compromise the anchor or slam the belayer into an overhead hazard.
Each component of your system should be independently strong. Strong rock/ice, strong placements, strong rigging.
Rock/ Ice:
Check the integrity of rock by inspecting it visually—looking for detached blocks, thin flakes, cracks surrounding the one you have a placement in—and smacking it with the heel of one hand (or ice tool) while feeling for vibration with the other and looking for movement.
With ice, feedback from placing an ice screw will tell you a lot about ice strength. Consistency of getting it in and the ice core coming out of the screw will indicate how solid the ice is. Any sudden ease of winding in and break in the ejecting core probably means an air pocket or soft ice and hence a poor placement.
Placements:
Fixed protection - Tighten loose nuts, be very wary if the bolt itself moves and check for corrosion (is it surface corrosion only and able to be scratched off, or deep?). Hit a piton with a hammer to see if it still sings (the high pitched sound you want from a good placement).
Traditional protection - Smaller pieces are weaker. Trad gear is also weakened when the wire of a nut or cam runs over a sharp edge, or it is badly placed. Learn what a good placement is for any of the trad gear you use.
Rigging:
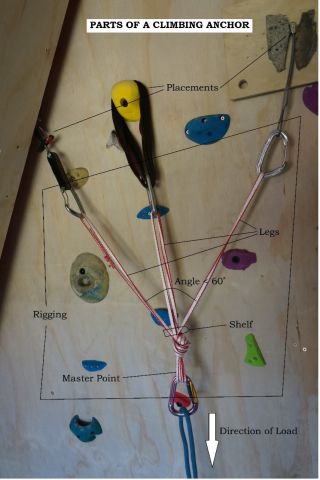
Angles - The various legs of your rigging should be set as much as possible for the expected direction of pull, have maximum angles of 90° and ideally less than 60° between the outer legs.
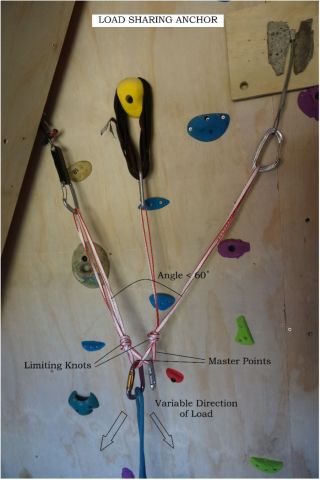
Load Sharing - Equalisation is often talked about but is very difficult to achieve in the field, so it is useful to think of the rigging sharing the load (sometimes called distributing the load). See below for more discussion on load sharing.
Extension - If one leg of the anchor fails, or the linking material (sling, cord etc.) is cut by sharp or falling rock, the anchor should be rigged in such a way as to minimise shock loading on the remaining system. This is sometimes called avoiding extension in the system. A load sharing anchor system will risk a small amount of extension to distribute load effectively.
Redundant
If any one part of your anchor system fails, be it rock, placement, or rigging, the rest of it should not be affected, giving you a fright rather than a flight. For example, if all your placements are in a single crack system, it had better be in ‘mothership’ rock that can’t fail, rather than a crack behind, or cracks around, a single flake or block. When linking your placements, make sure each leg is isolated from the others with a master point knot or limiting knots.
There are, of course, exceptions—such as if the anchor is a single large, completely solid, rock bollard or a strong well rooted tree, in which case you may have a single non-redundant anchor which is still good enough for the situation, as long as there is no chance of the sling/cord/rope around it being cut in some way.

Load Sharing
When the direction of load on an anchor will be constant, a traditional fixed master point set up will share the expected load sufficiently in most situations. When the direction of load changes, a load sharing anchor is a better choice as it will distribute load reasonably effectively with a variable direction of load. With a fixed master point anchor, a climber moving off the line of the set direction of pull by just a few degrees will cause most of the load from a fall to be on just one placement, greatly reducing the overall strength of the anchor.
Checked
From top to bottom, check placements, rigging, carabiners. It is sometimes only when the anchor is loaded a problem becomes apparent, such as a carabiner being loaded over an edge or the rope running over something sharp in a top rope set up.
Check anchors you set up and any others that you may have to rely on that you haven’t. It only takes seconds.
Finally
For those who like acronyms, here’s a few that have been around for a while. If it helps, pick one that makes most sense to you, and that you will remember (STRADS is probably the best of them). They mostly cover the main principles of Strong and Redundant, while leaving out a checking prompt and most have equalisation instead of Load Sharing (distribution):
STRADS: Strong, Timely, Redundant, Angle, Distribution, Simple
IDEAL: Integrity, Doubled, Equalised, Angles, Loading
SERENE: Strong, Equalised, Redundant, Effective, No Extension
It may be tricky to make an acronym out of it, but a good climbing anchor is:
Strong, Redundant, Load Sharing and Checked.
