Climbing Anchor Systems - Strength
By Gregg Beisly
From the previous article on climbing anchor basics, one of the fundamental qualities an anchor should have is that it is definitely strong enough for the expected forces it may experience. We’ll expand a fair bit on that in this discussion of anchor strength. Refer to the ‘Fundamentals’ article for terminology used here.
As mentioned previously, it is best to learn this stuff on a course or with a very experienced climber and use these articles for reviewing your knowledge. There are a lot of variables that affect the strength of a climbing anchor and so plenty of judgment is required in assessing them.
What sort of force will you have to build an anchor to withstand?
Forces (approximate) that a belay, top rope or abseil anchor could experience, taking an 80kg climber:
Abseiling smoothly: 0.8kN
Abseiling jerkily: 1.3kN
Top roping: Between 1 and 2kN. With a lot of slack in the system, around 4kN would be a worst case scenario.
Multi-pitch: A factor 1 fall-2kN in an upwards direction, which is a reminder your multi-pitch anchor usually needs to be multi-directional.
A factor 2 fall – Around 6kN depending on how clean the fall is, the rope used and how it is loaded in the fall. (Single ropes have a maximum impact force rating of between 8 and 9kN, Half ropes between 6 and 7kN and twin ropes between 10 and 12kN. In reality those high impact forces would only be reached in exceptional circumstances, such as the rope being loaded over an edge in a big fall).
See the notes below for fall factor explanation.
How do you know if an anchor is strong enough?
With experience and time on the rock you should get fast at evaluating rock and placement strength, be able to quickly link those placements and know if the resultant whole is strong enough for the application.
For those with less experience, there are a number of systems to help guide that decision making process, although none are perfect and judgement is still required.
One way is to score each individual placement in your system from 1–5, with 1 being poor and 5 perfect. Small pieces (cams and wires) can never be more than a 4. For a decent anchor you want individual placements to add to at least 10 points. So, two large, independent pieces in very good rock and perfect placements might constitute a strong enough anchor set up (or two good bolts). More usually the rock and placements won’t be perfect, and you will need more than two to have an adequate set up.
Sharing the load
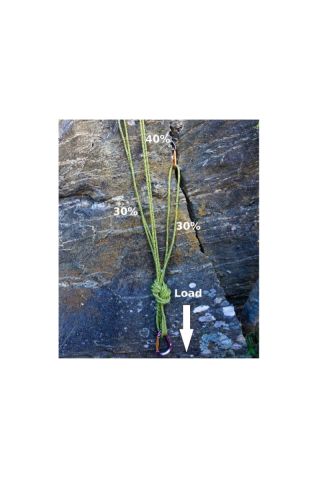
Sharing the load on an anchor is very important to overall anchor strength. From the ‘fundamentals’ article there are a couple of different base ways to link anchor placements: fixed master point, where the anchor is pre tensioned for the expected direction of load, and load sharing, anchors that self-adjust to changing directions of load.
With a fixed master point anchor, if the direction of load is in line with the expected direction of load it was set for, with careful tensioning with the same linking material, and a well dressed knot, you might be able to get the various legs of a 3-point anchor fairly well distributed. On the right the figure shows a setup that would be about as good as you could get it in the field, with each leg taking between 30% and 40% of the load (this is ignoring taking angles between legs into account for now).
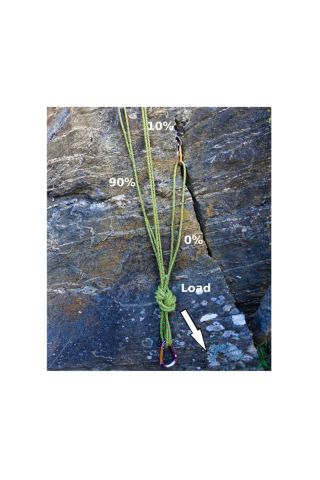
If the direction of load changes by just a few degrees then the distribution of load changes dramatically and may be more like the figure on the left, with one leg taking almost all of the load. In documented climbing accidents where a multi point anchor system failed, progressive failure of placements when the load was off line from the set tensioning feature (messing up the rigging so the anchor is not redundant being near the top of the list).
If there is a likelihood of a change in direction of load, using a load sharing anchor like a quad is a good idea as it will do a reasonable job of self-distributing load within a good range of directions, making your anchor stronger.
Angles
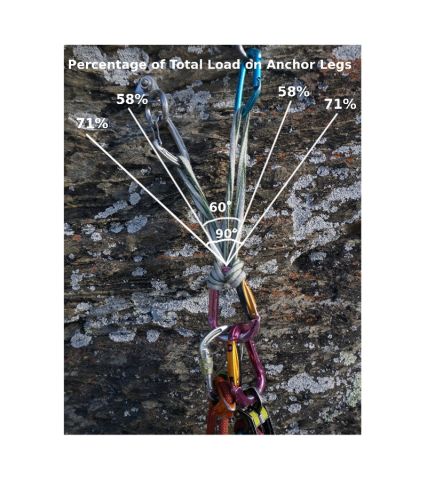
Keeping the angle between the outermost legs of the anchor rigging small helps keep forces on each leg as low as possible. If the legs are in line (0° inside angle) and perfectly distributed, each leg would take 50% of the total load. If that angle is 60° then each leg, in this example a two piece anchor, will have about 58% of the load on it. At 90° that increases to 71%. If you get above 120° then each leg will start to experience a load greater than the original at the master point.
So keeping the inside angle between legs low contributes to overall anchor strength.
Protecting A Multi-Pitch Belay Anchor
As noted earlier, in a multi-pitch context forces on a belay anchor can be significant in a nightmare fall past the belay. 6kN is enough to break softish or shattered rock or a small wire or small cam, particularly if they are poorly placed (loaded over an edge or a cam stem not aligned with the direction of load for example).
Protecting the belay anchor is a key skill of the multi-pitch climber. Putting in good protection as soon as possible when leading out from a belay should be priority, even if the climbing is easy for you.
Clipping one of the belay placements to reduce the fall factor and prevent a fall onto the whole set up is common. This may be a good idea if there is a top piece that is particularly strong (a large, well-placed piece in bomber rock or a good bolt) and the belayer is well below that. If the top piece isn’t very good then it may fail in what would be close to a factor two fall, and the progressive unzipping of your anchor may result.
There are a number of tactics that can be employed to prevent factor two falls onto belay anchors. For example, after building an anchor, the climber—on noticing it is a fair way to the first protection on the next pitch—can clip the anchor as a runner, climb to the first placement or bolt above, clip that and then down climb/be lowered back to the anchor. Now when your partner gets up you can lead the next pitch with the first protection above your belay already pre clipped, eliminating the possibility of a fall. You will need enough rope to do this and if you are not block leading you will need to swap rope ends with your partner. Another option, if you are low on rope, is to go down to the last good anchor option and construct a belay there. Another is to extend your attachment to your anchor's master point so you are well below it. The climber leading the next pitch can then clip the anchor as their first runner and the amount of rope out will lower the fall factor.
Notes On Fall Factors
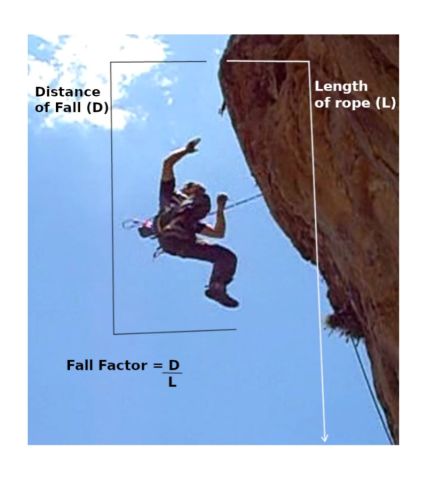
Fall Factor = Distance of Fall / Length of rope
In reality, due to rope drag at protection points and rope running over rock, a fall factor for a lead fall can be more than you expect.
So really it should be Fall Factor = Distance of fall / Length of rope available for energy absorption
Using extendable draws at strategic points to keep the rope as straight and free running as possible will lead to easier climbing, softer falls and a lower impact force on the top runner.
Petzl has some good diagrams and explanations of impact forces and fall factors at https://www.petzl.com/US/en/Sport/Fall-factor-and-impact-force---theory
