
Crampons 101
By Gregg Beisly
Soon after being given my first ice axe—a beautiful Chouinard Frost with the more modern laminated bamboo shaft—it seemed like a good idea to help take my non-climbing grandad up Tahurangi in the early winter. About five hours of step cutting later, we made it to the summit and completed a traverse of the mountain in the dark. I had to wait a few years before being able to afford my first crampons, but I suddenly got much faster in the high alpine. There was a reciprocal and steady decline in strength, until the present day where I could probably only manage five minutes of step cutting on a good day, but that has been an acceptable trade off.
Crampons are a crucial tool for the mountaineer to master. Getting well trained in their use and being well practiced on them is key to managing the major goal of mountaineering—that is, to never fall off a mountain!
This document is to help climbers get to know their crampons better, but isn’t a substitute for the hard work that it takes to become very proficient in their use.
Parts of a Crampon
So we all know what I’m writing about, here are the various parts of different crampon types.
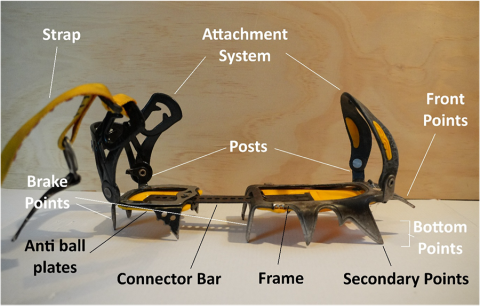
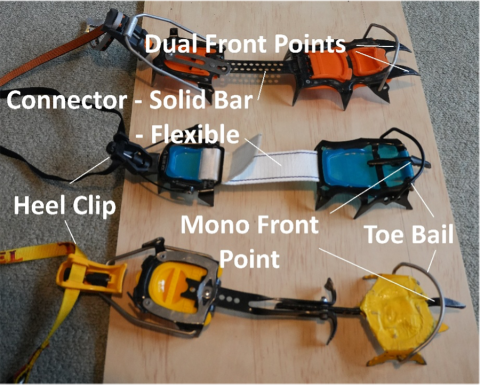
Types of Crampons
Crampons can be split into several general categories based on how they attach to boots and how rigid they are – and hence what boots they are suitable to use with. They are further differentiated by the configuration of the points and material they are constructed with.
One common way to categorise crampons that mostly focusses on boot suitability is the C1 – C3 system.
C1 Crampons (AKA Flexible or Strap-on crampons)
These work with all boot types and are the only ones suitable for flexible (B1) boots. They use a full front and rear harness system that will hold them on soft boots securely. The bar connecting the front and rear sections of the crampon (the connector bar) can be flexible in order to bend with soft boots, which makes walking in them easy on low angles but keeping the front points in the right position on steep terrain difficult.
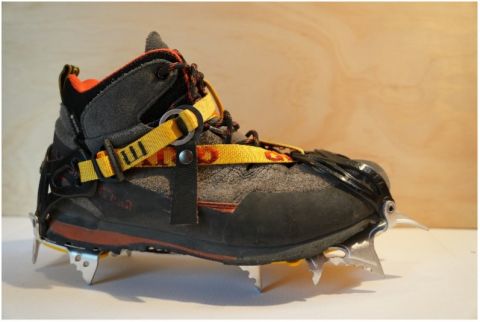
C1 crampons might have 10 or 12 points, with the 10 point variants generally being more suited to easier walking terrain.
These crampons are suitable for most beginner level courses in the 10 points models and for intermediate and advanced general mountaineering courses in the 12 point variety.
There are a few disadvantages of a full harness C1 crampon. They take a bit more work to get them on and off. The fit can be imprecise with little customisation possible, particularly on the toe section, making it difficult to get these tuned for steeper climbing. It is vital the strap stays tight and in certain crusty snow conditions the buckle can be loosened during a plugging mission.
C2 Crampons (AKA Semi-automatic or Hybrid crampons)
For semi rigid (B2) and rigid (B3) boots that have a heel welt for a crampon heel clip. Generally have 12 points and can include some models with aggressive teeth for ice and mixed climbing.
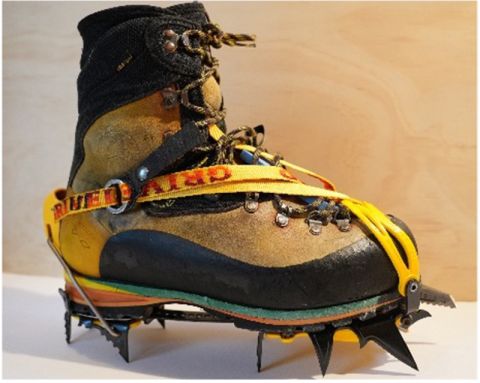
These crampons are versatile and don’t rely on the boot having a deep toe welt that is in good condition.
C2 crampons are suitable for beginner, intermediate and advanced general mountaineering courses when they have a standard 12 point configuration and may even be suitable for ice climbing courses if they come with aggressive front points like the example in the picture.
C2 crampons suffer from lack of ability to customise the toe harness position in order to get the most out of the front points on steep climbing. With these there is also often a small, barely perceptible, movement between boot and front posts/harness which can make some models feel less precise on hard steep ice. As with the full harness of a C1 crampon, it is important the strap remains tight to hold the crampon on and this can be an issue in some snow conditions.
C3 Crampons (AKA Automatic, Step-in or Rigid crampons)
Suitable only for rigid (B3) boots that have deep heel and toe welts, these crampons have a wire toe bail and a heel clip system. They are quick to put on, generally have aggressive points and may have a rigid bar connecting the front and heel sections of the crampon, which transfers force from a kick at ice efficiently to the front point, making these the best ice climbing set up.
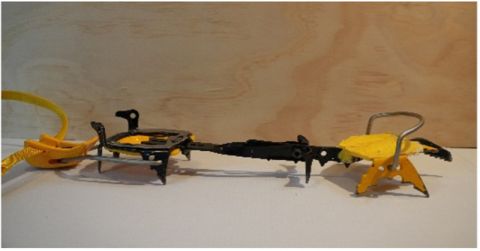
These crampons are ideal for ice climbing courses, as long as they are paired with a suitable B3 boot with excellent toe welts. The position of the heel clip and toe bail can usually be changed to customise their position and hence can be made to fit to a boot precisely. The strap is also there just for securing the heel clip in place and as a keeper in case a crampon comes off—don’t let this happen though.
The main downside of C3 crampons is the possibility for sudden failure if the toe bail comes off. Fit these crampons carefully and make sure they are fully compatible with your boots, which should be in good condition at the toe welt.
Fitting a Crampon
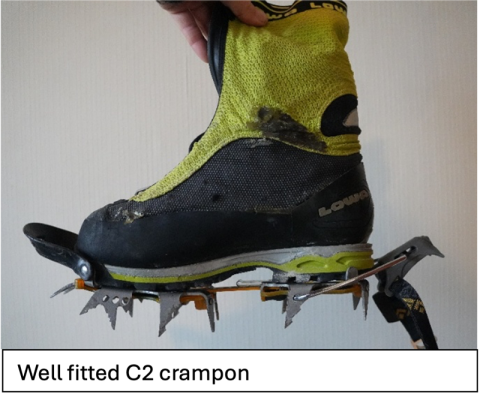
It is very important to get the crampon to fit your boot well. This is best done at home before a trip rather than out on the mountain on your first day of the season. Not all boots and crampons of the correct type work well together due to the geometry of their designs so be aware of this when buying a pair. If your crampon fails and separates from your boot it will most likely be because of an error in pairing them with the correct boot or in fitting them properly.
A good fit will mean there is no chance the crampon will separate from the boot regardless of the forces applied to it.
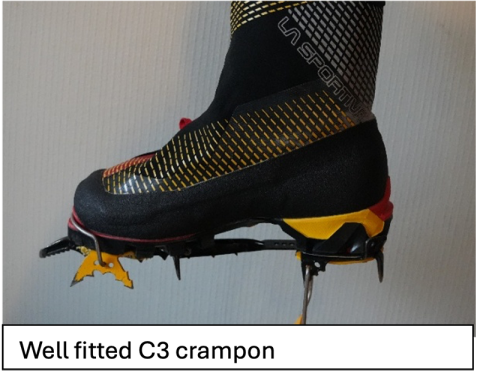
For C1 and C2 systems there are small posts the toe and heel of the boot should be hard against. A well fitted crampon will stay on the boot when the boot is lifted without the harness system used.
For C3 crampons the frame should stay attached to the boot with just the toe bail and rear posts, before the heel clip is applied. Well fitting heel clips will make a nice firm snap when levered into place and the toe bail will be well into and tight on the boots toe welt. More on that later.
Parts of a Crampon—the detail
Attachment System:
Harness
A harness system is needed for all C1 crampons. This is a versatile system that can work with almost any boot. The plastic of the harness will degrade over time and if heavily used can crack and fail so inspect these carefully.
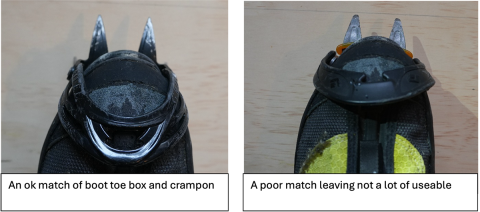
Be aware that as the posts at the front and rear are in fixed positions, some boots will not fit well if the toe box is a poor match for the post separation. In the examples below the narrow toe box of this boot needs a smaller post separation or longer front points (such as in the picture below, left) so that the toe doesn’t protrude too far over the front points, rendering them less useful on steep terrain. The picture below, right, shows a crampon with a wide separation of front posts and short front points, meaning there is not a lot of front point to be used. This is advantageous if the intention is to just walk in the set up but any steep front pointing will be a relatively disappointing experience.
Heel Clip
Heel clips need a boot with a heel welt made to take them. The clip may need careful adjustment to fit the boot perfectly. There is usually some form of screw to turn to move the clip unit up or down and some crampons have extra holes in the heel frame to change the position of the clip significantly.
Toe Bails
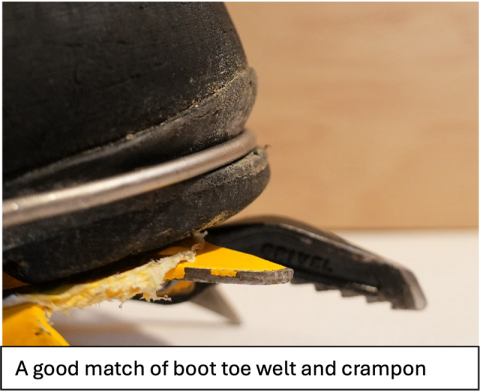
Toe bails come in different shapes and thickness of wire. Not all toe bails will work well with all boots. The shape should be pretty close to the shape of your boot toe box and very importantly the boots welt should be deep enough so that the wire of the bail is completely enclosed.
The wire should have an extra bit of boot material sticking out on the under side (such as on the example on the right) or there is a chance of the toe popping out, particularly with twisting forces. Boot toe welts wear down so keep an eye on that.
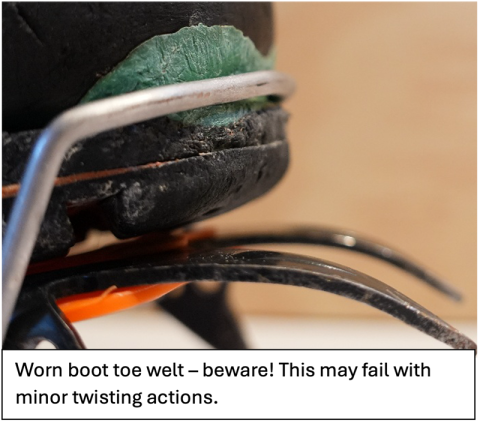
In the example to the left, the toe welt has worn down so that the wire bail is not completely within the welt. This is very dangerous and a catastrophic loss of the crampon from the boot is on the cards. A C2 crampon would be fine on this boot.
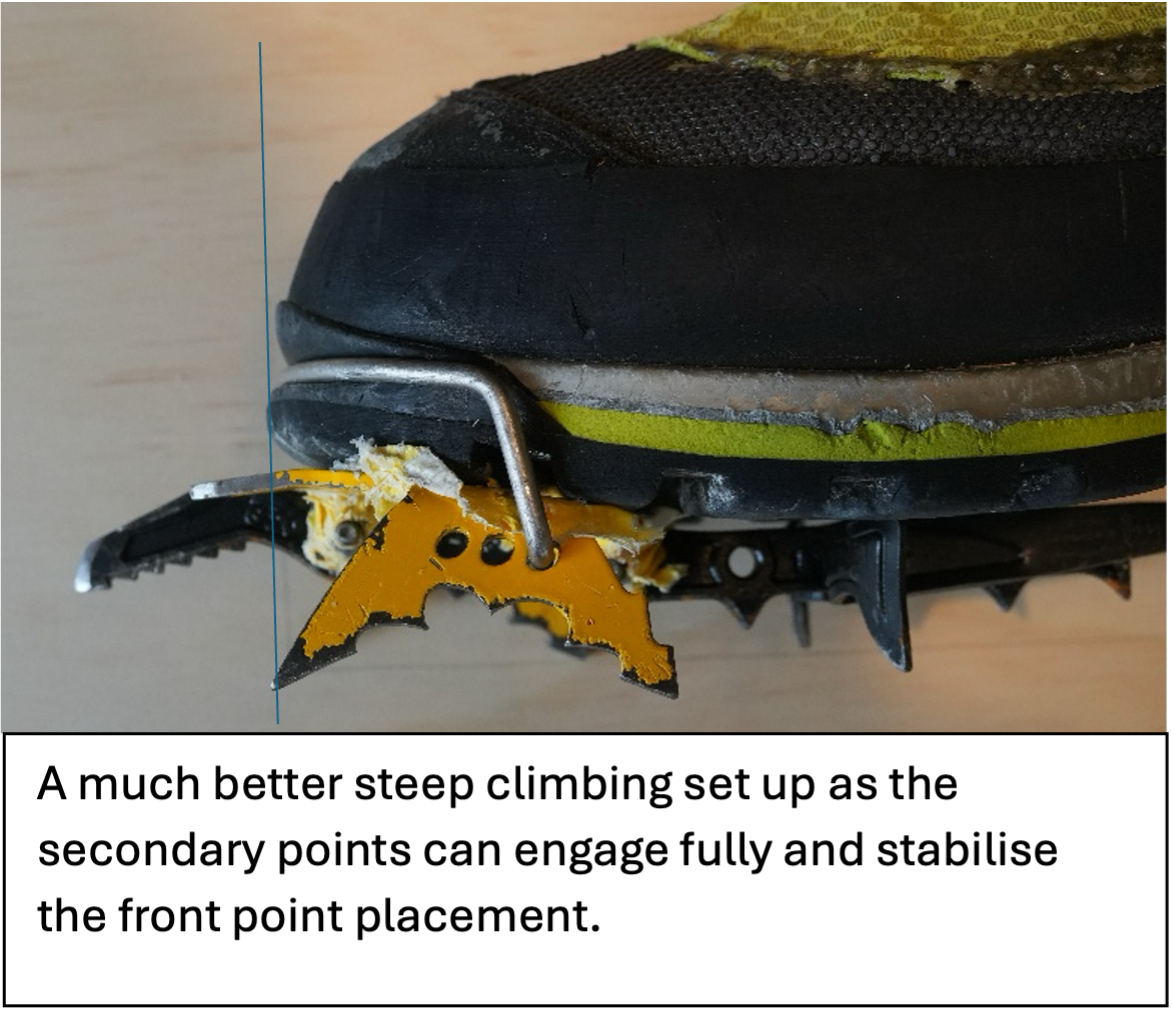
There are often several holes on the frame the toe bail can be set to and this can make a significant difference in how well the crampon performs in steep ice climbing. If the bail is set too far forward, the position of the toe of the boot will prevent good contact of both front and secondary points.
For standard alpine climbing the bail should be set so the toe of the boot lines up with the seconary points. For steep ice climbing the bail should be set further back so the boot toe is slightly behind the secondary points. See exampes below.
Strap
There are a number of ways to secure any extra strap so it is not a trip or snag hazard. Whatever is done must leave the inside of the boot as clean of any protrusions as possible.
One option is to cut the strap so there is not too much spare left. Leave at least 15cm spare when attached to the biggest boot you might use the crampons with.

Tying knots in the spare strap, on the outer side of the boot, is a common way to deal with any extra. Other methods which are tidier, stay put all day and don’t freeze up and cause problems at the end of it are tucking it through the velcro closure of a gaiter or tucking it down and back up boot laces if not wearing gaiters. Both examples shown below.
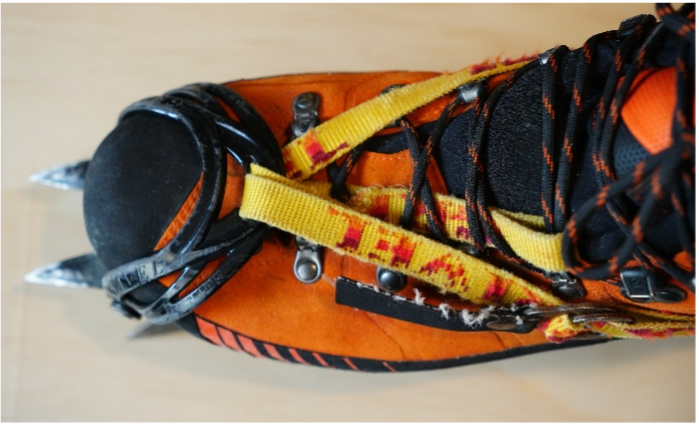
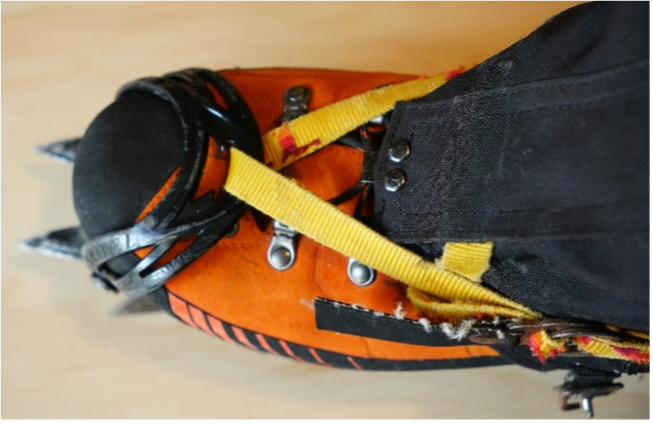
Note that in both examples above the buckle is positioned to be as protected as possible from plunges into snow.
Parts of the Frame:
Bottom Points
Some crampons have shorter points. These are useful for when a fair amount of rock will be encountered on a route and any snow will be firm. A downside is in conditions where there is a soft snow layer over hard snow or ice, the points may not be long enough to get into the firmer stuff below, reducing their holding power.
Having two sets of points aligned 90 degrees to the rest is standard. These resist the crampons shearing through softer ice and snow when walking downhill with crampons straight down the fall line. Some crampons (such as Blue Ice Harfangs) have only one set of points aligned for downhill resistance so a bit more care is needed when descending in certain snow conditions.
Front Points
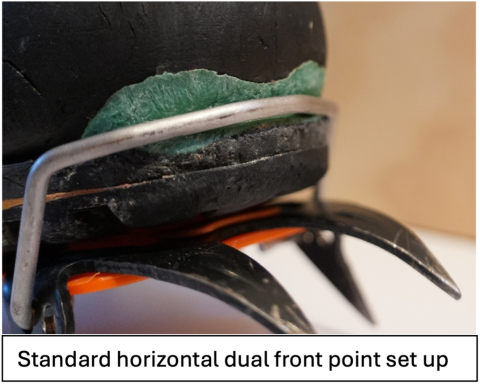
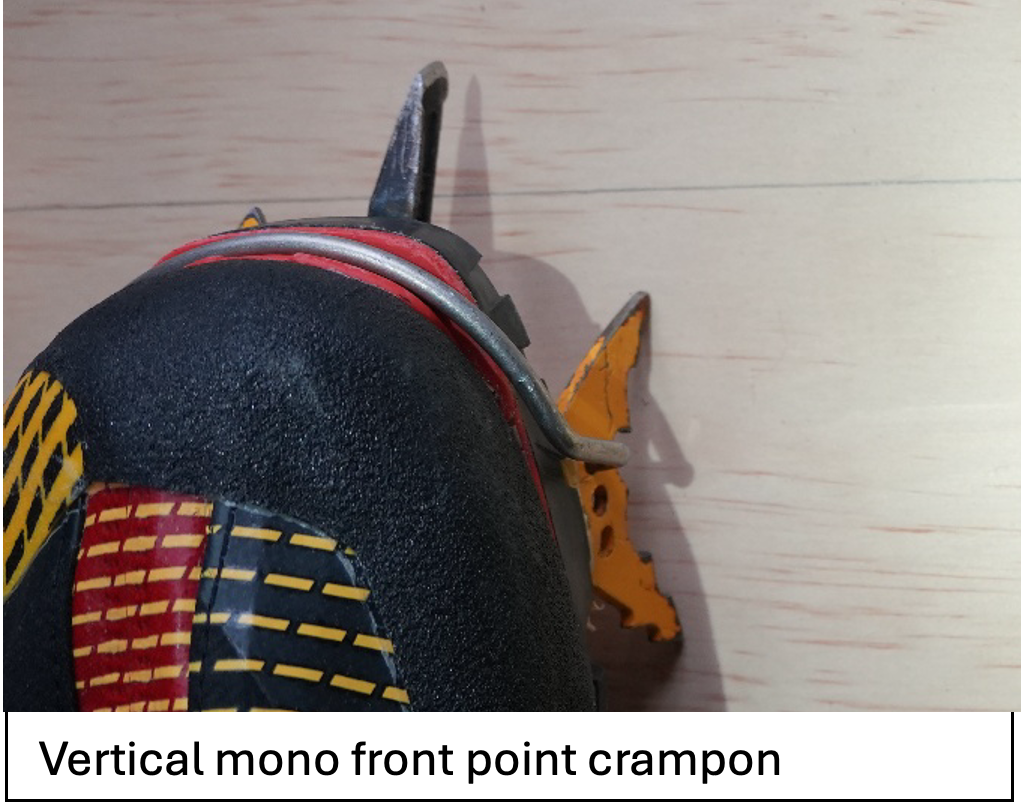
General mountaineering crampons have 2 horizontally aligned front points. This gives the best support in snow and soft ice. More technical crampons generally have 1 or 2 vertically aligned points that are like the tips of an ice climbing pick. Many modern technical crampons can be changed between mono and dual configurations and also replaced when they wear out. Monopoint configurations are best for mixed climbing and steep ice climbing. Dual vertical front points are slightly better in soft ice/firm snow, but relatively clunky on hard ice, by displacing a lot more ice, and much worse in mixed terrain as it is easy for a small movement to lever one point off a placement or be limited in where the points can be used.
Secondary Points
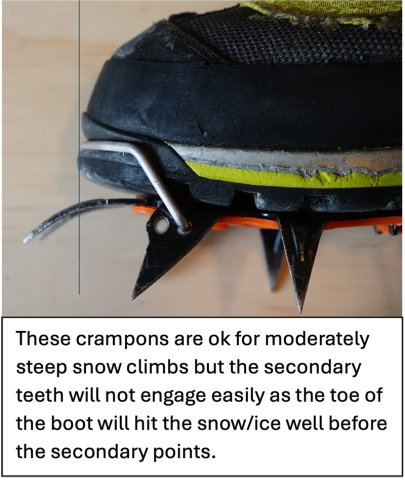
These are needed to engage the ice to stabilise a front point placement and reduce calf fatigue. They should be roughly in line with the toe of the boot for snow climbing and just a little in front for ice climbing crampons. If the boot protrudes forward of the secondary points then on kicking into ice, the toe of the boot will contact the ice and prevent the secondary points from engaging, unless the foot is in a poor position, too heel down, which can lever out the front points.
Anti-Balling Plates
Anti balling plates are fortunately now standard on modern crampons and assist greatly with minimising sticky snow compacting under your boots and turning your crampons into skates. Some anti balling plates have designs that shed snow are more effective than others, such as Grivel models that have a bubble feature that compresses when stood on and pops out when unweighted, in order to shed snow faster.
Connector Bar
Most crampons will have either a thin flexible bar for use with B1 flexible boots, or a thicker rigid bar for semi rigid B2, and fully rigid B3 boots. Some have either spectra cord or wide webbing connecting the frame. These are great for packability but need careful adjustment to make sure they don’t loosen over a period of use.
Material
Chromoly Steel
Most crampons are made of this steel alloy. This steel strikes a reasonable balance between strength, weight, ability to hold a sharp edge, durability and cost and so is the most common material used in crampons. Some add nickel to make ‘ballistic steel’ for technical front points, which makes them more durable and longer lasting.
Stainless Steel
Some manufacturers, most prominently Black Diamond, use a stainless steel alloy for their crampons. Advantages are resistance to corrosion and lack of a surface coating. They can be a bit more expensive, as the manufacturing process needs to be more precise to avoid flaws, which was a problem in the early days of stainless steel crampons.
Aluminium
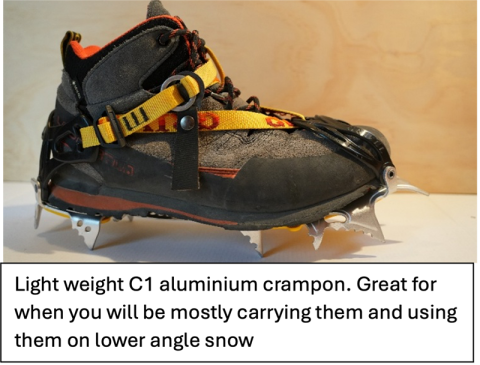
The chief advantage of aluminium crampons is the light weight. This can be a huge plus on fast and light missions or when ski touring where no more than hard snow is expected. They don’t handle hard icy conditions well (partly because they need to be a little thicker than steel crampons and so don’t penetrate as effectively) and blunt quickly when used on rock and hard ice.
Hybrid Material
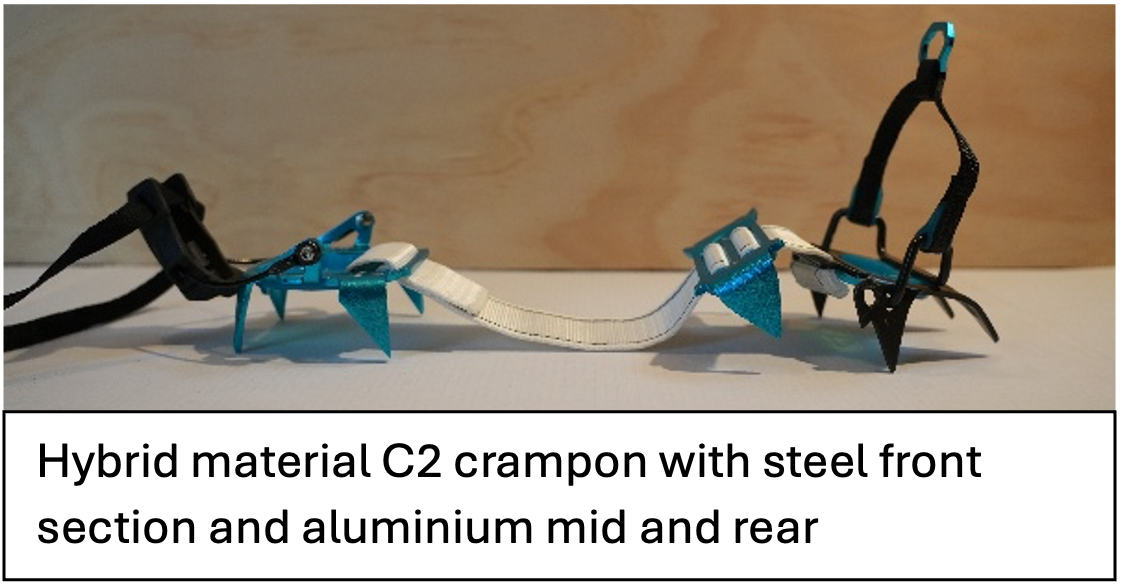
Some crampons, such as this version of the Harfang, have some aluminium and some steel points to maximise lifespan on the more intensely used points.
Maintenance and Sharpening
Dry out your crampons after use before storing them. Don’t leave them in the sun, to preserve the soft materials (such as the harness and strap).
Keep the points sharp by using a fine hand file, holding the crampon firmly and following the original shape of the points. Over sharpening can reduce the lifespan of the crampon, but sometimes you need them pretty spiky. If you are mostly climbing in the Southern Alps moderately sharp bottom points are usually sufficient, unless you are heading to certain high alpine objectives such as the Grand Traverse of Aoraki Mt Cook, in which case very sharp is the way to go for the long sections of hard ice. If you are climbing on Ruapehu or Taranaki, keep the points good and sharp, or face skittering over the surface of bomber ice on your descent from the pinnacles or other climb (or just walking from the hut to the café at times).
Field Repair
A steel crampon will last a long time if looked after. However, they aren’t indestructible and do break. Any soft material – strap and plastic harness will degrade and can eventually fail with age and use. Connector bars are probably the most common point of breakage. I have managed to break a steel frame before after very heavy use on mixed and hard ice routes. I’ve also seen rivets on C1 and C2 systems fail a couple times. On big missions it is not a bad idea to carry a simple crampon repair kit of a mini pair of pliers and short length of wire. With these you can temporarily fix most crampon breakages.
Crampons for NZAC Courses
There are some crampon types that work better on certain courses than others. As long as boot compatibility is taken into account, the table below shows the crampon types that are ideal, OK, and those that shouldn't be used on that particular course.
| NZAC Course | C1 Crampon | C2 Crampon | C3 Crampon | |||
|---|---|---|---|---|---|---|
| 10 point | 12 Point | 12 Point | Vertical Front Points | 12 Point | Vertical Front Points | |
| Beginner Snowcraft | OK | Ideal | Ideal | OK | Ideal | OK |
| Intermediate Snowcraft | Not Suitable | OK | Ideal | OK | Ideal | OK |
| Avalanche Courses | OK | Ideal | Ideal | OK | Ideal | OK |
| Glacier Ski | OK | OK | Ideal | OK | Ideal | OK |
| Intro to Backcountry Ski | OK | Ideal | Ideal | OK | Ideal | OK |
| High Alpine Skills | Not suitable | OK | Ideal | Ideal | Ideal | Ideal |
| Leading on Technical Ice | Not suitable | Not Suitable | Not Suitable | OK | OK | Ideal |
Crampons by Alpine Objective
For those who are mostly after something for their tramping boots for some winter walks and maybe easy transalpine passes, C1 crampons with 10 or 12 points will work well.
If you want a versatile crampon that will do most things well, a C2 crampon with hybrid harness and 12 points is a good option. These will climb easy to hard alpine routes with compatibility with semi rigid and rigid alpine boots, which is what you generally want on your feet in the high alpine during most seasons.
For decent mixed climbing and steep water ice, a C3 crampon with monopoint is the way to go.
For most ski touring a lightweight and packable crampon such as an aluminium or hybrid material model is ideal, unless there is some serious climbing to be done on the trip.